I have several Micro SD Cards for my Raspberry Pi. However, they often get mixed up because they are so small:
Unlike regular SD Cards and Flash Drives, I cannot label them. How can I organize them?
I have several Micro SD Cards for my Raspberry Pi. However, they often get mixed up because they are so small:
Unlike regular SD Cards and Flash Drives, I cannot label them. How can I organize them?
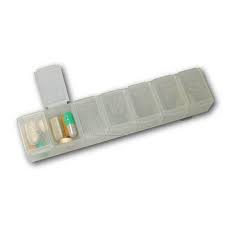
I believe the most efficient way is to use a pillbox, like this one:

This is what I do. They are pretty strong, have enough space and they are very cheap. There are many different kinds, if you fancy.
This isn't a hack, really, but a nifty existing product made to solve your problem: a credit-card-sized multi-micro-SD holder.
I linked that one kind of at random, but there are other similar products, all under $10. In this version, one side has spaces to write to provide a label for each card. Of course, you have to match them to the slot, but assuming you keep that straight, no problem.
(I guess you could also use a basic color-coding scheme and small bits of colored sticker or paint on each card to match.)
You could get a piece of cardboard and cut Mirco SD sized holes into it and then write what each one is above or below its respective hole.
You'd need to put a backing on the card so that the SD cards don't just fall straight through if you try and pick the board up - try something like another sheet of cardboard or even paper, if you're looking for a more protective solution, do the same with Styrofoam or something similar (however Styrofoam is prone to static build up and could lead to the SD Card being damaged or destroyed).
You could also put the cut out into a small plastic cover (something like a normal SD card or an old Game Boy game case) which would then keep them all sorted and all in one place!
Here's a link to instructables where I was able to find something similar to what I am describing.
If that doesn't do it for you then you could invest in something like a small fishing box with lots of small compartments and have one compartment for each SD Card - might be a bit over the top for such small devices but it is up to you!
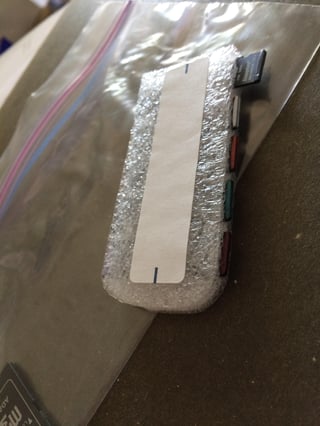
The credit card microSD card holder suggested by mattdm inspired me to make this. It's part of a foam insert from a cheap cell phone case. A lot of different products come with this common packaging filler material. I cut it down with scissors, cut little slots in the sides with an exacto knife, and stuck a write-on label on it. Mine's 3 x 1.4 inches and hold 10 cards, 5 on each long side. The cards feel secure in it, and I plan to carry it in a snack size ziplock baggie with card adapters and cables and other micellanea. It would also fit in an altoids can if that's more your style. The colors on the microSD edges are nail polish. Not the prettiest solution, but it'll get the job done.

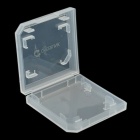
There used to be old cases for Nintendo DSI games. Use those, as they fit a Micro SD neatly and can be labeled.
Like one below:

If I had this problem I think I would use a tiny paintbrush and write a numbering sequence on each one beginning with 001. Keep a spreadsheet saying what the numbers represent.
Try to find at Amazon.
I use a color marker (example) to paint colored dots on them. (Started using nail polish). I sort them by the first dot color, keep them in pillbox each slot assigned with a color. And on the pillbox a label with the colors and content of each one. Also a spreadsheet as backup or more detailed content description if needed.
To literally label them so you can tell them apart, you need only to make them distinguishable. Think resistor color codes: use a couple different "light" (writes on black background) Sharpies to give each one a distinct color code.
You can also completely color over one side with the white/silver Sharpie, and then be able to write a single digit or letter on it using an ultrafine Sharpie.
This is in addition to keeping them stored nicely, with compartments matching the code and full labels for what each one is.
SD/SDHC Memory Card Hard Plastic Cases
https://www.amazon.com/Slots-Memory-Plastic-Tronixpro-Microfiber/dp/B00UNQT714
Each unit has twelve containers for SD cards.
I use a label maker to add a label to the door.
I had always the problem that I either forgot my Micro Sd Cards at home or that I lost them because they are so small.
This is why I designed the Micro SD Ball - a container in form of a 3,5 cm ball, which you can unscrew and which can hold up to 6 Micro SD cards.
The cards are held by small springs in the bottom part of the ball, so that they well protected and can not fall out.
The ball can get attached to a keyring or a bag, so you have your cards always with you.
If you like one you can either download the STL files at Thingiverse to print one ...
https://www.thingiverse.com/thing:3354442
... or order your copy at Shapeways
https://www.shapeways.com/product/YTH7TW9S5/mirco-sd-ball-bottom?optionId=83985161
I found this option which is very cheap and cute and you can use an indelible pen to write something small in the plastic to remember what the cards are.
Another option for the labelling could be getting some stickers and stick them in the plastic so it's easier to see the name.
I usually just buy the Micro-SDs in the version that have an adapter with them. They're not that much more expensive than just buying the Micro-SD by itself.
In many cases, they come with a small box with room for the micro-SD and the adapter. When something is installed in them, I add a small label to the case.
You might end up with a lot of SD card adapters in the end, but having one too many of those is still much better than having none..
A few years ago, I helped make a small, wooden rack for normal SD cards for a photographer to hold 40-50 SDs on his desk. For labeling we used plastic keyhangers (the kind where you slip in a piece of paper) glued to the box. on one side, we made a few small trays for spare SDs (sorted by size), that he and his employees could take when needed.
I don't have a picture of the SD-organizer, but it was essentially a small wooden block with two rows of slots fitted to the size of an SD card. Each row had a small indentation for easy grip of the card. The keyhangers had inserts made in the wood and were glued down.
The wood was then given a coating of laquer, and it looked pretty stylish on the table in the end.
A Micro-SD version would probably need some routing or CNC gear to work (or make it with a 3D printer). However, the standard SD size can be cut out by hand (with dexterity and patience), and you can glue old Micro-SD to SD adapters in and have them hold the Micro-SDs.
I don't think that labelling them is impossible and I made my own attempts with tiny, usually two-line labels printed with a Brother P-Touch series label printer.
Such labels printed are small enough to fit onto a microSD card and thin enough to work with most (normal-size) SD card slots or readers, so that method is fine for older Raspberry Pis.
But those labels already too thick for most microSD card slots, at least for those on the Raspberry Pi 2 and 3. They either shave off when putting the microSD card into the slot, or, if I managed that, they're much harder to get out again, especially with the Raspberry Pi 3 which has no more counter spring inside the slot.
I recently discovered that there are also non-laminated label cassettes for Brother P-Touch label printers and they're said to be much thinner. Will probably try these. Those fitting for my label printer all seem to have the product number prefix "TZe-N" with "N" standing for "Non-Laminated". Will probably try the 3.5mm and 9mm widths.
I also found a thread somewhere else where the same topic has been discussed. Someone found thin enough labels and made a Microsoft Word template for printing them in the proper size. You still need scissors to cut the labels into that small size alongside a dotted line printed from the template.