Updated Method #3 based on recent experience.
Source Link
RobotZombi
  • 867
  • 1
  • 5
  • 10
  • Rotary tool with diamond-grit cut-off wheel to cut the lock open (some lock components will be hardened tool steel; you can try using other cutting tools like a hole saw or jumbo bolt cutter, but they may not, you know, cut it.)
  • (optional) Painter's tape to protect computer surface from the adhesives used by the following other tapes
  • Duct tape to seal all computer openings, cracks (metallicopenings; metallic dust will fry a computer very quickly if you let it; packingit. (packing tape might, duct tape, etc. also do the trickwork, but they tend to leave behind a layer of sticky residue)
  • Foil tape to protect immediate surrounding surface of computer from sparks (painter's tape willpaper tapes can burn, and duct tape will melt;plastic tapes can melt. regular metallicaluminum foil might workworks, if you use a couple of layers andhowever; just make sure to secure it well enough.)
  • Big ol' pair of pliers (pipe wrench, vice grips, what-have-you) to hold the lock steady without putting your hands in harm's way
  • Good solid pair of safety glasses--or even better, a full face shield (your eyeballs don't like flying specks of red-hot steel any more than your computer does)
  • (optional) Good pair of work gloves (must be heat-resistant; rubber and artificial fabrics are prone to melting to your skin, which would be worse than not wearing any gloves at all)
  • Shop vacuum and/or damp rag/paper towel to clean up metallic dust before removing tape afterwards (damp rag is highly recommended; vacuum is optional)
  • Back up the computer's contents first. This will probably void your warranty.
  • If teardown instructions are available for the computer, look them through; if it's possibleeasy enough to remove all ofseparate the sensitive electronics from the portion of the case wherehousing with the lock is attached cable lock, it may be worth doing so.
  • Be thorough about protecting the computer with the tape. Even the tiniest of openings could let in a computer-killing flake of metallic dust!
  • Clear a good-sized workspace on a flame-resistant surface (no veneers or other "pretty" surfaces, although a solid wood work bench would be fine) with plenty of ventilation.
  • Take it easy. Cutting hardened steel too aggressively can result in damage to your cutting tool, the computer, and yourself if you're not careful.
  • Position the cutting wheel such that sparks are directed away from the computer (and away from yourself, for that matter). The foil will help, but not that much!
  • Take it in stages. If the lock heats up too much from the friction of the cutting wheel, it could damage the computer.
  • Rotary tool with diamond-grit cut-off wheel to cut the lock open (some lock components will be hardened tool steel; you can try using other cutting tools like a hole saw or jumbo bolt cutter, but they may not, you know, cut it.)
  • (optional) Painter's tape to protect computer surface from the adhesives used by the following other tapes
  • Duct tape to seal all computer openings, cracks (metallic dust will fry a computer very quickly if you let it; packing tape might also do the trick)
  • Foil tape to protect immediate surrounding surface of computer from sparks (painter's tape will burn, and duct tape will melt; regular metallic foil might work, if you use a couple of layers and secure it well enough)
  • Big ol' pair of pliers (pipe wrench, vice grips, what-have-you) to hold the lock steady without putting your hands in harm's way
  • Good solid pair of safety glasses--or even better, a full face shield (your eyeballs don't like flying specks of red-hot steel any more than your computer does)
  • (optional) Good pair of work gloves (must be heat-resistant; rubber and artificial fabrics are prone to melting to your skin, which would be worse than not wearing any gloves at all)
  • Shop vacuum and damp rag/paper towel to clean up metallic dust before removing tape afterwards (damp rag is highly recommended; vacuum is optional)
  • Back up the computer's contents first. This will probably void your warranty.
  • If teardown instructions are available for the computer, look them through; if it's possible to remove all of the sensitive electronics from the portion of the case where the lock is attached, it may be worth doing so.
  • Be thorough about protecting the computer with the tape. Even the tiniest of openings could let in a computer-killing flake of dust!
  • Clear a good-sized workspace on a flame-resistant surface (no veneers or other "pretty" surfaces, although a solid wood work bench would be fine) with plenty of ventilation.
  • Take it easy. Cutting hardened steel too aggressively can result in damage to your cutting tool, the computer, and yourself if you're not careful.
  • Position the cutting wheel such that sparks are directed away from the computer (and away from yourself, for that matter). The foil will help, but not that much!
  • Take it in stages. If the lock heats up too much from the friction of the cutting wheel, it could damage the computer.
  • Rotary tool with diamond-grit cut-off wheel to cut the lock open (some lock components will be hardened tool steel; you can try using other cutting tools like a hole saw or jumbo bolt cutter, but they may not, you know, cut it.)
  • Painter's tape to seal all computer openings; metallic dust will fry a computer very quickly if you let it. (packing tape, duct tape, etc. also work, but they tend to leave behind a layer of sticky residue)
  • Foil tape to protect immediate surrounding surface of computer from sparks (paper tapes can burn, and plastic tapes can melt. regular aluminum foil works, however; just make sure to secure it well enough.)
  • Big ol' pair of pliers (pipe wrench, vice grips, what-have-you) to hold the lock steady without putting your hands in harm's way
  • Good solid pair of safety glasses--or even better, a full face shield (your eyeballs don't like flying specks of red-hot steel any more than your computer does)
  • (optional) Good pair of work gloves (must be heat-resistant; rubber and artificial fabrics are prone to melting to your skin, which would be worse than not wearing any gloves at all)
  • Shop vacuum and/or damp rag/paper towel to clean up metallic dust before removing tape
  • Back up the computer's contents first. This will probably void your warranty.
  • If teardown instructions are available for the computer, look them through; if it's easy enough to separate the sensitive electronics from the portion of the housing with the attached cable lock, it may be worth doing so.
  • Be thorough about protecting the computer with the tape. Even the tiniest of openings could let in a computer-killing flake of metallic dust!
  • Clear a good-sized workspace on a flame-resistant surface (no veneers or other "pretty" surfaces, although a solid wood work bench would be fine) with plenty of ventilation.
  • Take it easy. Cutting hardened steel too aggressively can result in damage to your cutting tool, the computer, and yourself if you're not careful.
  • Position the cutting wheel such that sparks are directed away from the computer (and away from yourself, for that matter). The foil will help, but not that much!
  • Take it in stages. If the lock heats up too much from the friction of the cutting wheel, it could damage the computer.
fixed title for method 2
Source Link
RobotZombi
  • 867
  • 1
  • 5
  • 10

Method 12: Pick the Lock

Method 1: Pick the Lock

Method 2: Pick the Lock

Resized image and added link to full size image
Source Link
Alex
  • 4k
  • 5
  • 26
  • 45

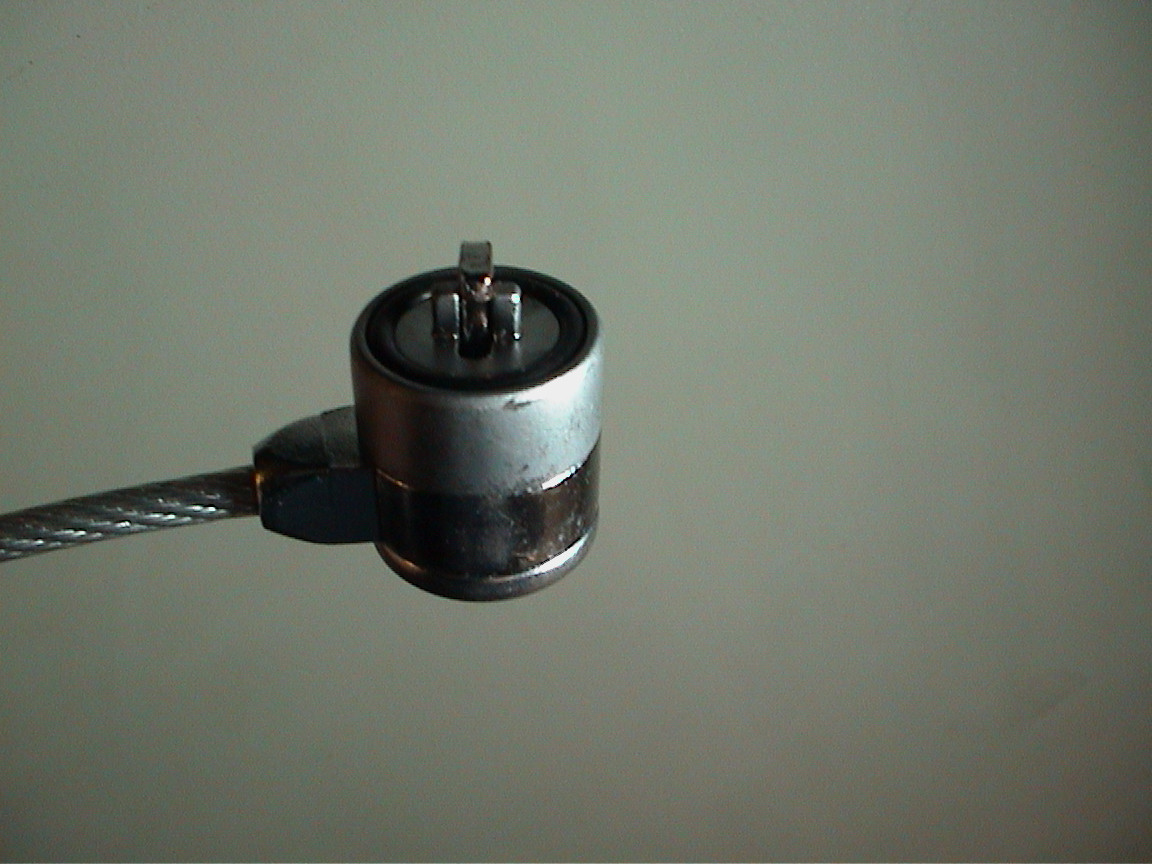
Depending on the make/model of the cable lock and the make/model of the computer in question, this method may or may not be practical for your application. The gist of it is to cut apart the body of the lock, exposing the two-piece core: these are the two-peg outer core and the T-shaped inner core that rotate relative to each other to engage/disengage the lock. Once the outer lock mechanism is completely cut away, you should be able to rotate these two pieces by hand, releasing the computer from its grip. Close-up view of Kensington-Slot cable lock

Close-up view of Kensington-Slot cable lock

Depending on the make/model of the cable lock and the make/model of the computer in question, this method may or may not be practical for your application. The gist of it is to cut apart the body of the lock, exposing the two-piece core: these are the two-peg outer core and the T-shaped inner core that rotate relative to each other to engage/disengage the lock. Once the outer lock mechanism is completely cut away, you should be able to rotate these two pieces by hand, releasing the computer from its grip. Close-up view of Kensington-Slot cable lock

Depending on the make/model of the cable lock and the make/model of the computer in question, this method may or may not be practical for your application. The gist of it is to cut apart the body of the lock, exposing the two-piece core: these are the two-peg outer core and the T-shaped inner core that rotate relative to each other to engage/disengage the lock. Once the outer lock mechanism is completely cut away, you should be able to rotate these two pieces by hand, releasing the computer from its grip.

Close-up view of Kensington-Slot cable lock

Source Link
RobotZombi
  • 867
  • 1
  • 5
  • 10
Loading