3

I had a biopsy right in the center of my upper back and have been told to do the following daily:

  • gently clean the site with soap and water (no scrubbing)
  • apply Vaseline
  • cover it with a band-aid

However, it's really difficult for me to reach and I don't have anyone to ask for help. I think I might be able to apply Vaseline with a clean spatula, but I'm not sure how I can effectively clean the wound or get a band-aid on with any precision.

8 Answers 8

4

I am assuming that you can’t reach the wound.

Before you remove the old bandage1, find a door frame or some other vertical outward corner. Mark the height of your wound by gently(!) leaning on it - even if you can’t reach the actual wound, you should be able to reach back far enough to determine the height with reasonable precision, add some kind of removable marker. Also, if your wound is slightly off-center, note where the vertical edge touches your back. No need to hurry, take your time.

To clean your wound, you can use a towel as an “extended washcloth”: Wet the center and gently maneuver it across the wound or, if that’s too harsh, flip it over your shoulder so that the wet part meets the wound and gently lean on a waterproof surface. Think “dabbing with your body” instead of dabbing with the cloth.

Don’t fiddle with anything to apply the ointment separately, putting the vaseline on your band-aid will get it to the right place automatically.

And now on to the band-aid: Prepare a generously sized piece (if it’s a bit bigger, it won’t matter if your not as precise in positioning it). Add the ointment on the padding of the band-aid and remove the paper from the glue strips. Go back to your door frame and fix the band-aid with a loop of tape (I recommend washi tape), sticky side outward. Use your mark to get the correct height and let the edge of the door frame meet the center of the band-aid. Like this: mounted bandage
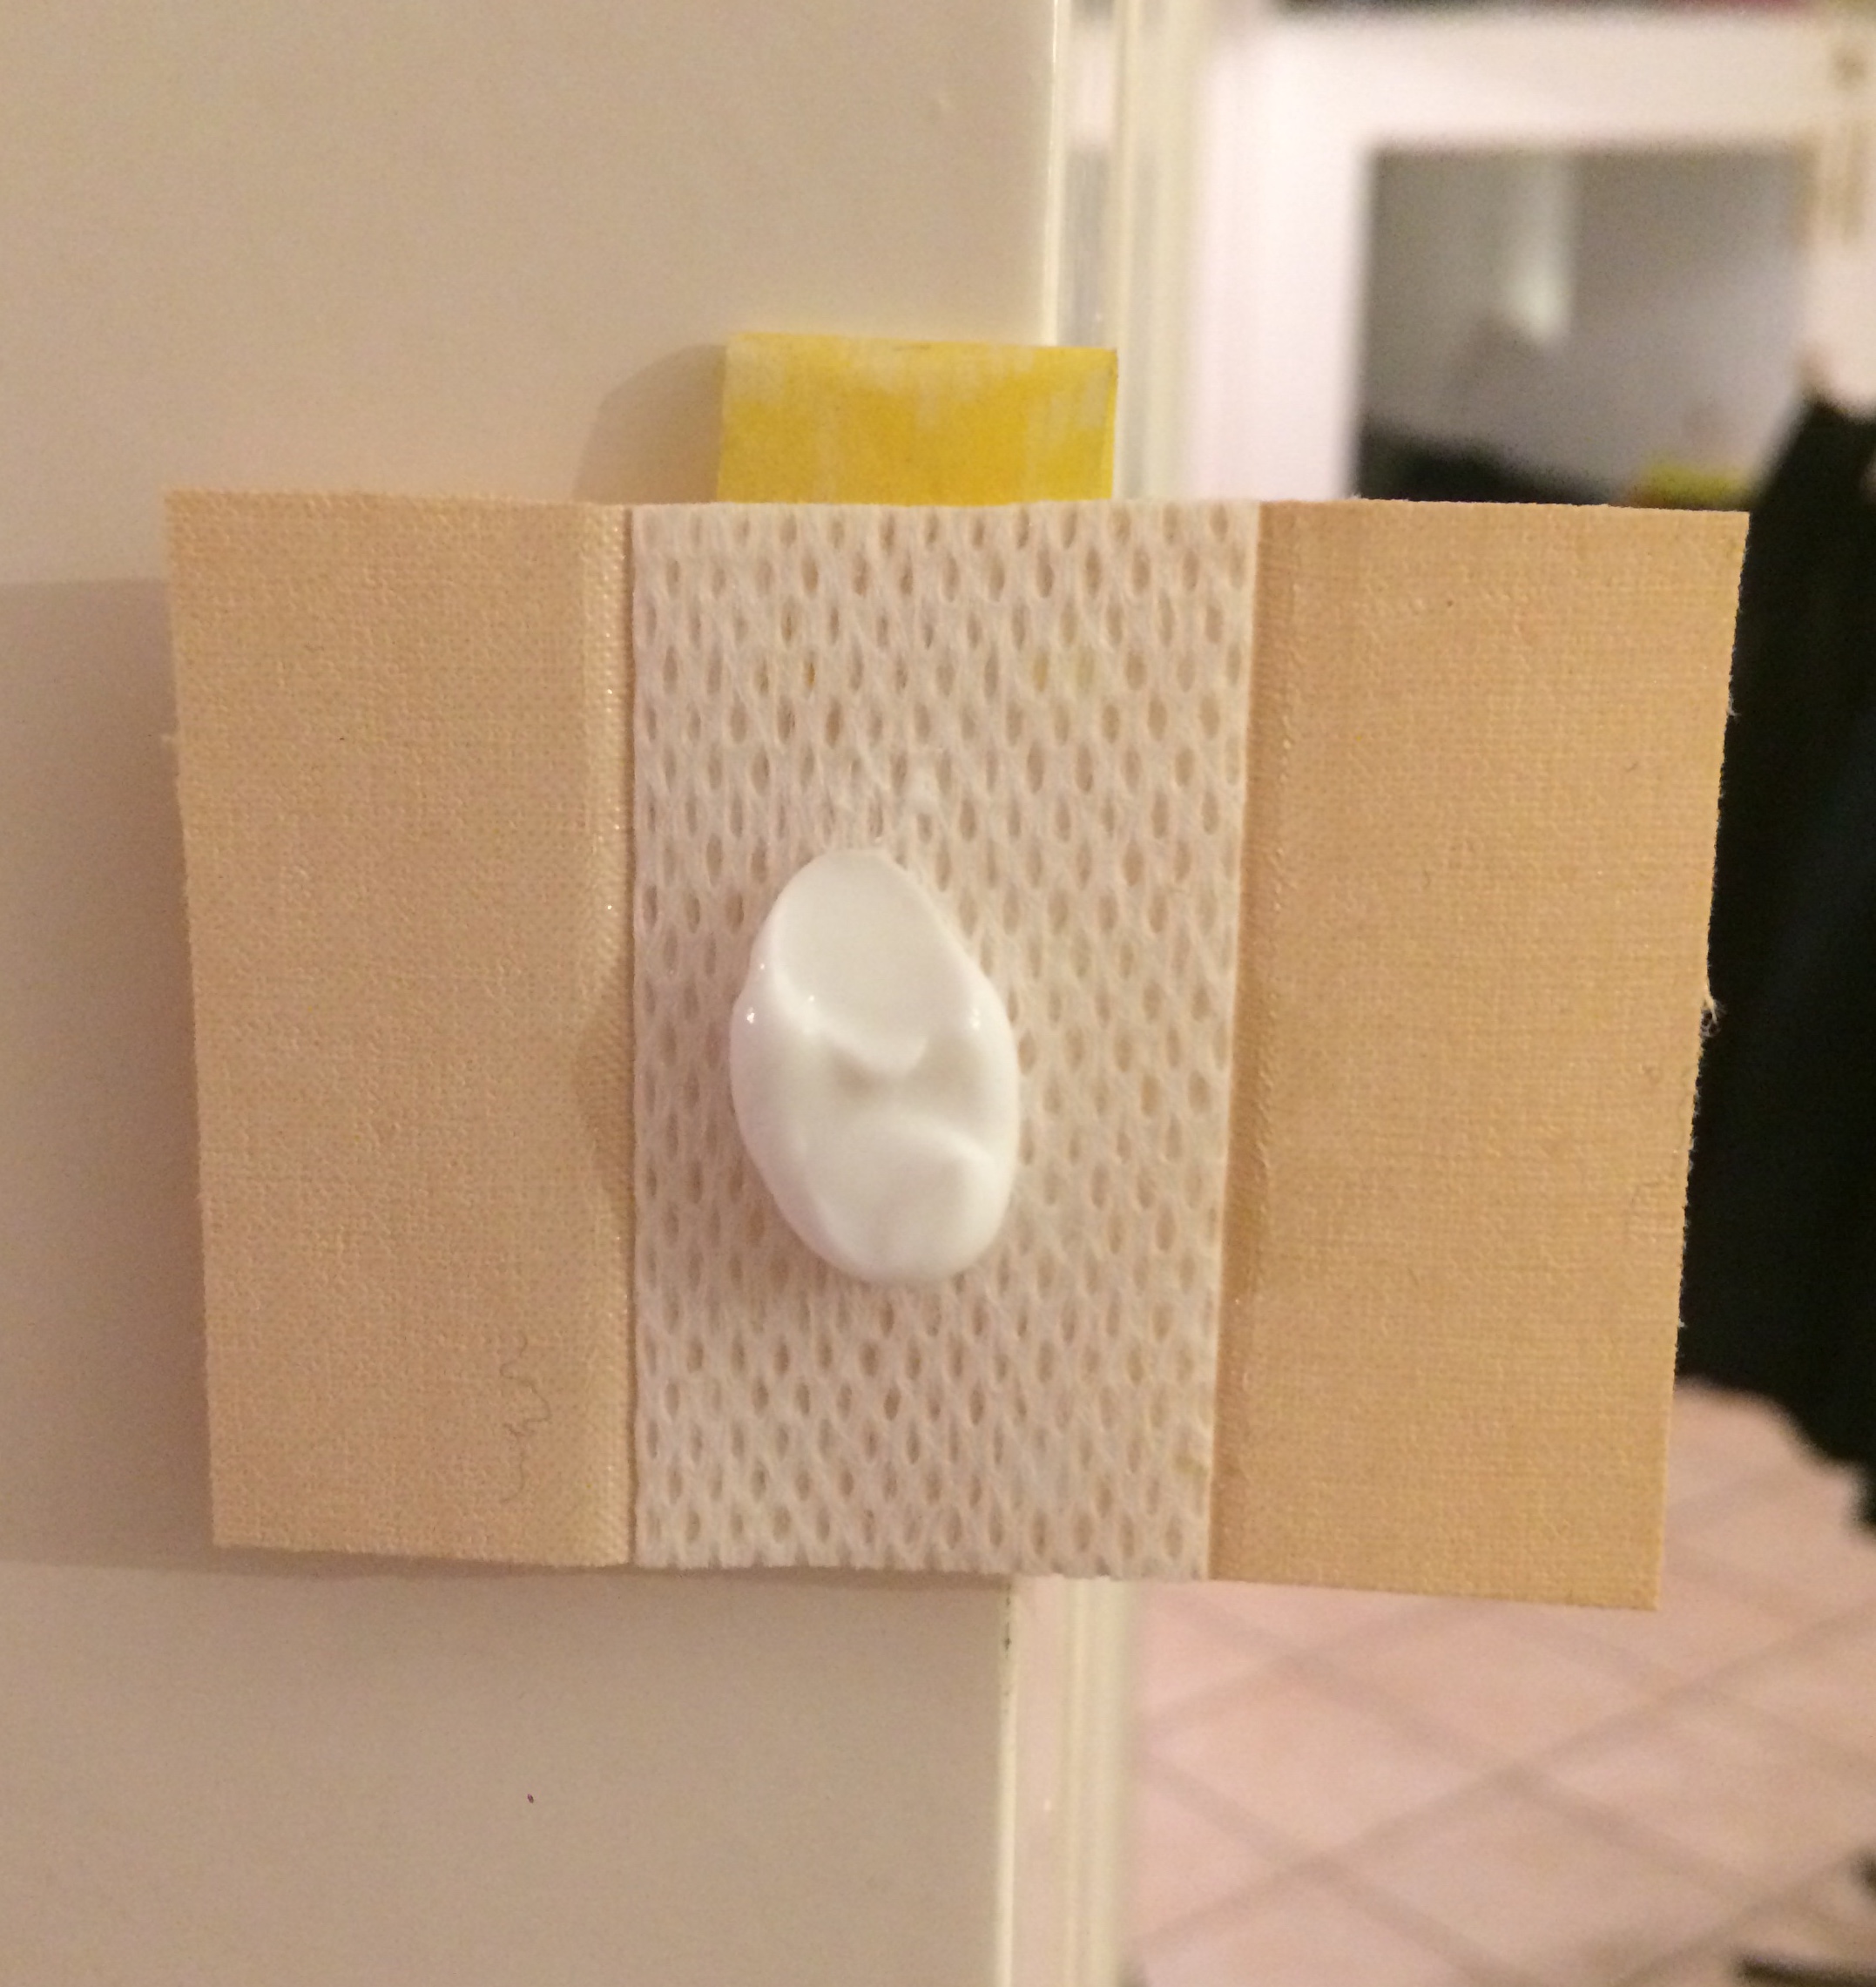
Lean on the band-aid (remember the correct vertical position determined before!) and use the edge of the frame to push the sticky parts onto your skin. The tape used for mounting the band-aid should stick more to the smooth surface of the door frame than to the fabric of the band-aid, especially if you used washi tape.

Side note: The method works, I successfully tried it myself.


1 Will there be a second question ”How to get a band-aid off a wound I can’t reach?”...

2
  • This is really great, thank you. Luckily getting the band-aid off was not a problem but this helped me to clean and dress the wound again. Much easier than the contortions I was putting my shoulders through.
    – rocinante
    Commented Dec 14, 2018 at 5:17
  • @rocinante glad to hear that and I hope you’ll get better soon!
    – Stephie
    Commented Dec 14, 2018 at 5:18
2

After a couple of tries I'm finding the best way to apply the bandage is using the long handled shoehorn (with a loop of tape) and long handled spatula to press the edges of the applied bandage. Removal with those tools also works along with a pair of long nose pliers. The fact that everything is reversed in the mirrors (vanity mirror and medicine cabinet mirror combo) makes this difficult task even harder. Stick with it (no pun intended!).

1
  • What's with all the mirrors? Stand in front of a TV or other video monitor, prop your mobile device behind you running as a video camera, and cast it to the TV. (Make sure the camera isn't running in mirror mode.) Commented Apr 26, 2023 at 12:41
2

I have tried all of the above with varied levels of success and frustration. I have found the best way, for me, is to use a lint remover roller... it already has a lightly adhesive paper tape to hold the non-sticky side of the bandage to it.

What you need: room with a mirror, lint removal roller, handheld mirror, long shoehorn or spatula, bandage.

  1. Place the bandage on the roller and remove the paper from the bandage.
  2. With a mirror in one hand to aim and watch, press the bandage to the target area with the roller.
  3. Roll the roller back and forth, applying the bandage to the incision.
  4. Use a long shoehorn or spatula to do final flattening and smoothing.

This has yielded the greatest success and least frustration.

1

If it’s just precision you’re after, not reach (i.e. you don’t have a problem manipulating your arms to reach the spot), consider setting up 2 mirrors facing each other, at a slight angle. You need the slight angle to avoid your body fully blocking the view to your back.

Stand between the mirrors (or hold one in one hand with your back to the other mirror). This will allow you to see what you’re doing. As a bonus, by reflecting off 2 mirrors, your left/right will be the image’s left/right respectively.

3
  • This is helpful for seeing the spot, but unfortunately placing a band-aid with precision is still physically difficult.
    – rocinante
    Commented Dec 14, 2018 at 5:14
  • Precision comes in 2 parts: knowing where to put it, and being able to put it there. I assumed the second and helped with the first. :)
    – Lawrence
    Commented Dec 14, 2018 at 7:01
  • @rocinante By the way, you can combine this answer with the other to achieve both parts. Use the mirror(s) to help with maneuvering and the sticky tape etc to help with placement. To help with taking the bandage off, use a long-enough piece of bandage that you can easily grab at least 1 corner.
    – Lawrence
    Commented Dec 14, 2018 at 14:48
1

This discussion was extremely useful in my current battle with an infected cyst right in the middle of my back where I couldn't reach. I used the loop of tape on the door jam method to hold the 3 by 4 inch bandage and backed into it to secure the bandage. Although it wasn't perfect, it covered about 95% of the wound though it crinkled and stuck to itself a bit. Good enough. That was the first try. I have six more days to perfect my technique. HOWEVER I'd like to contribute to the removal of bandage discussion. Using the medicine cabinet mirror angled with the mirror over the sink so I could see what I was doing, I used the handle of a 1 foot long plastic shoe horn to loosen the bandage edge and a pair of those longish angled pliers to grab that end, I was able to remove the bandage applied by my doctor. The flatter side of the shoe horn was useful to pat down the bandage. Some others said they used a wooden spoon. I did sterilize the materials in boiling water first. Another useful "tool" was a large metal spoon used to remove things like dumplings from boiling water. It worked like the shoe horn to flatten the bandage.

1

In countries with free health-care many people don't realize that in such cases you can just go to your regular clinic and request a help from the nurse there. At least in Poland you can.

4
  • Welcome! This is probably a corner case of an X-Y-problem. Some may see this as non-answer, I think it can be a viable alternative under certain limited circumstances.
    – Stephie
    Commented Feb 23, 2020 at 16:55
  • @Stephie I don't really understand the purpose of your comment.
    – jaskij
    Commented Feb 23, 2020 at 16:56
  • As I said - some may consider this suggestion not viable, especially as the asker was sent home with care instructions. It’s similar to saying “find someone other to do it for you”. You could say the purpose of the comment is to actually defend your suggestion. If you don’t like it, I have no problem with removing it again.
    – Stephie
    Commented Feb 23, 2020 at 16:59
  • Being sent home with care instructions is normal. It is easier to have someone at home do this for them. But many people simply do not realize that they can go to their clinic for help if they have no one around. I wouldn't call this a non-answer because of that. In a place where this service is available but have no one to ask this is a valid reminder.
    – jaskij
    Commented Feb 23, 2020 at 17:28
1

I had a similar situation as the question author and the other answers were immediately helpful.

For future back wound care that employs a bit more precision, I purchased a set of 12" long stainless steel "kitchen" tweezers, with serrated handles and pincers. The set included one straight pincer set, the other curved pincers. They are heavy duty, and grab gauze, bandages, etc. with precision. Having 2 of them makes easy work of cleaning the incision and removing, re-positioning and applying a bandage.

I purchased a set of 2 from the website named after a rain forest and river in South America. My set cost $8.99, but there exist a plethora of similar options less and more expensive.

0

BAND-AID ON BACK VER 1.0 1-I got my back “band aid” loosened with a 12” metal spoon (may get a 15”); & finished the removal with a 12” tweezer. This was using two almost-facing cabinet door mirrors. It may work with wall mirror and hand-held mirror.

2-I put a small hand-towel 14” x 27” on a bed. I placed the top of my hip bone at lower edge of towel had someone mark where the “wound” hit the towel. Then I placed 3” x 3” gauge pad, with tape on two sides, over the mark on the towel. With top of hip bone at lower edge of towel I laid back & firmly pressed my back into the towel. Note when the Doctor “burns/scrapes” the cancer spot you can ask her to place two marks on the “paper” sheet covering the bench. One mark at the top of your hip and the 2nd mark at the location of the surgery, and you take the paper sheet home.

Your Answer

By clicking “Post Your Answer”, you agree to our terms of service and acknowledge you have read our privacy policy.

Not the answer you're looking for? Browse other questions tagged or ask your own question.