8

I spent an hour perfectly measuring the position of 3 nails to hang 3 identical picture frames on my wall. Everything went fine and I'm certain that from a mathematical point of view the nails are exactly in the right positions.

But once I hang the picture frames on them, it looks totally crooked. They all lean towards one side and the edges don't line up. Maybe the frames are really a bit heavier on one side, or my wall isn't really smooth, but every time I nudge them into level, they just move back into their crooked positions.

How can I level a picture frame that hangs from one single nail?

I won't accept solutions that:

  • require driving in any more nails
  • are visible in front of the frames
  • leave permanent marks on the wall / wallpaper, like some glues and tapes do

This is the back of a frame and I hang them from the little hanger marked in green. The hangers are positioned perfectly at the center.
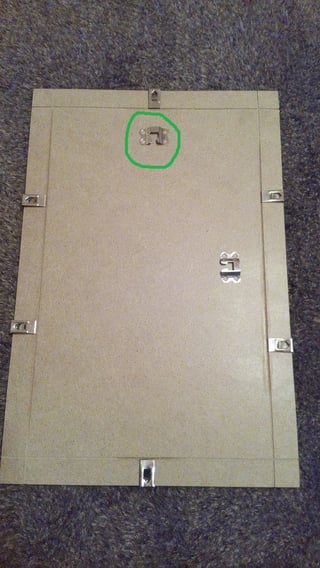
picture frame from behind with centered hanger

8
  • Have the pictures been previously hung? Commented Sep 24, 2019 at 18:25
  • @WeatherVane Yes, I moved them from one wall to another. I didn't open the glass fronts and the contents haven't moved around in them. They are quite heavy for picture frames, though. About 900 grams.
    – Elmy
    Commented Sep 24, 2019 at 18:27
  • 2
    If the bottom of a frame is against the wall, but the top sticks out from the wall, the pictures will look crooked. This is especially true if you aren't standing straight in front of them. Commented Sep 24, 2019 at 20:50
  • 4
    Are you sure (as in measured yourself, with a spirit level) that everything nearby the should be level actually is level? Hanging the picture next to a crooked door frame or over a sofa on an uneven floor can be infuriating - if it looks level it isn't and vice versa
    – Chris H
    Commented Sep 25, 2019 at 14:39
  • 1
    @DavidK I only want to avoid permanent marks on the wall. I don't care much for the backside of the frames, as long as they fulfill their purpose (hold the picture up wrinkle-free).
    – Elmy
    Commented Sep 26, 2019 at 13:25

8 Answers 8

20

The hook marked in green has a ribbed top edge.

Adjust the position of the picture so the nail is located at one of the indentations, so it hangs level.

If it droops one way on a particular groove, and the other way on the next groove, then you need to counterbalance the picture.

You can do this by attaching a weight, such as a clean nail, to one of the clips on the left or the right of the picture, perhaps with cotton or string, which can be removed later.


Maybe the pictures really are level, but their subject matter creates the illusion that they are crooked.

4
  • 2
    Regarding your last point: note that if the top of a picture is sticking out from the wall and the bottom is against it, that can also make a picture look like it's hanging crooked. Commented Sep 24, 2019 at 20:47
  • A small level might be all OP needs, balanced on top of the frame and centered.
    – Criggie
    Commented Sep 25, 2019 at 11:02
  • I've also used coins as a counterbalance, taped to one corner of the back.
    – David K
    Commented Sep 26, 2019 at 13:20
  • Maybe the pictures really are level, but their subject matter creates the illusion that they are crooked. I had something similar happen once - the picture was perfectly level, but it turned out the wall was not (old construction). Both floor and ceiling had a nearly-imperceptible slope to them which made it impossible to hang anything in such a way that it would line up and also be true level. Commented Sep 26, 2019 at 17:43
11

Use adhesive rubber "feet" on the bottom corners of the frame. These come in a variety of sizes and thicknesses. They will not mark the wall, and are removable from the frame later.

The rubber feet will keep the frame in the same position, even if it is not perfectly balanced.

If mounted in exactly the right spot, they will not be visible from most angles. They will also bring the bottom of the frame out to a distance similar to the hanging hook, making it flatter.

1
  • 1
    This is the right answer. In fact there is another hanger at one side, so that needs to be evened out as well.
    – RedSonja
    Commented Sep 26, 2019 at 11:06
8

Try the old school way: Tie a length of string/cord/wire to both upper side lugs so it can be pulled taut as a triangle with the apex a bit lower than the top edge of the frame. Hang the string on the nail - you will see you can slide/rotate the frame into level position.

3

I'm assuming you have the typical braided wire across the back of all the pictures and you're hanging the pictures by putting the wire across the nails. If the picture isn't level, it means one side is heavier than the other by a small amount. You'll need to slightly slide the picture across the wire away from the direction of the lean. This will effectively add a little weight to the other side of the nail and the picture will hang straighter. You might have to do a couple of small adjustments to get it just right. If there is an equal amount of weight on each side of the nail, it will hang level. Of course you'll have to do this with each picture in turn.

If you don't have a wire, but are hanging the pictures from the top edge of the frame, then the procedure is still exactly the same. The idea is to balance the weight equally on each side of the nail. If you can do that, the picture will be level.

3
  • 5
    The OP must have added the photographs of the hangers after you posted this answer. You should review the photographs and revise your answer. (It's a good answer, it just doesn't apply to the type of hanger the OP is using!) Commented Sep 24, 2019 at 20:48
  • 2
    I was about to suggest he adds a wire to hang from. Plus a picture to explain what I mean. Maybe add that to your answer?
    – Vilx-
    Commented Sep 25, 2019 at 12:25
  • I find wires to be almost as likely to be crooked as the sawtoothed hanger in the pic. It doesn't take much vibration in the wall from the floor or a nearby door to get them sliding around, unless there's 2 nails. Commented Sep 25, 2019 at 23:54
3

Try sliding the top and bottom hooks (the ones keeping the sandwich* together) to the left or to the right - this might help getting the balance back, without using anything else.

The hook NOT marked in green (positioned on the long edge) might also contribute to the imbalance. If possible, remove it or install another one to the other side.

*sandwich = glass + picture + back cardboard

3

Blu Tack, since it will also be used to support the side to side motion only a small bit is needed and it rarely leaves a mark.

2

Tape:

Make a small loop of masking tape or some similar non-marking stuff like painter's tape with the sticky side out. Place the loop of tape on the bottom edge of the frame so that it does not show when the picture is hung. The tape will help hold the position of the frame so it does not swing to alter the position of the frame when you let go.

Tacks:

Alternately, I have used thumb tacks with vinyl-coated heads that also help keep the frames from changing position. The thumbtacks are put into the painted walls at the position of the frame corner. The thumb tacks have the added benefit of creating a slight air space between the wall and the frame so that the the paint will tend to discolour less after some time.

Good luck

1

Use the top clip instead.

Don't use the hanger marked in green. The clips that hold the frame together are made so that you can hang the picture directly on them and the position can be adjusted until the frame is balanced.

My experience is that the right position for the top clip is usually very slightly different than the geometric middle. It's not noticeable when looking at the frame but measuring the midpoint with a ruler to find the clip position often doesn't work. I guess the material is not really homogeneous. This is also why I had bad experiences with using the "official" hooks.

The upside is that there are no little nooks, making balancing easy. Also, once the position of the clip has been adjusted you can remove and rehang the frame in an instant. The downside is that your nails are already there, so the frames will hang lower than you intended. If that is too low for you, you'll have to plant new nails, although you can use the exisitng ones as reference, so at least it won't take another hour.

3
  • Hi, Welcome to Lifehacks. I've done this and noticed that if the frame assembly is heavy, the springy clips tend to distort somewhat. Couldn't this possibly detach the top clip? Elmy mentioned that the frames were heavy.
    – Stan
    Commented Sep 25, 2019 at 19:19
  • Neither the picture or hanger is centered on the geometric center, it's the center of gravity. With wood frames, you get differences in density of the grain, which means some pieces are heavier and even one end of the frame edge can be heavier than the other. This usually means the geometric and balance centers aren't aligned. And those sawtoothed hangers are usually centered on the geometric center rather than the center of balance. Commented Sep 25, 2019 at 23:59
  • @Stan I had several pictures hanging that way with no issues for years. I can't say anything about the OP's frame specifically but judging from the picture it appears to be rather light.
    – Rad80
    Commented Sep 26, 2019 at 10:05

Your Answer

By clicking “Post Your Answer”, you agree to our terms of service and acknowledge you have read our privacy policy.

Not the answer you're looking for? Browse other questions tagged or ask your own question.